2017年7月19日星期三

Three Steps to Clone a DVD

If you want to clone DVD easily and quickly, you can never miss DVDFab DVD Copy, for it can help you clone DVD with only three steps. In addition, if you do not have a blank disc at hand or want to save money, you can use DVDFab DVD Copy to clone the DVD to ISO file and save it on your hard drive. The following is a step-by-step tutorial to teach you how to clone a DVD with DVDFab DVD Copy.

Step 1: Choose the Clone/Burn mode
Run DVDFab 10, go to Copy module and choose Clone/Burn mode.

Step 2: Load the source
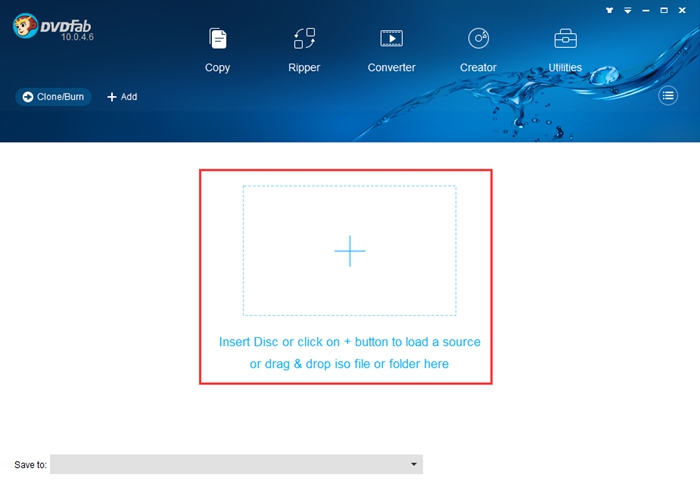
Insert your DVD into your optical drive and DVDFab will load it automatically.

Step 3: Select a directory and start the clone process
Navigate to the bottom of the main interface to select an output directory: to select your optical drive as the directory from the drop-down list is to clone DVD to a blank disc; to select a directory by clicking the “image” icon is to save the output as ISO image file. After the directory is selected, you can click the “Start” button to start clone process.


The whole process will be finished in a few minutes. If you choose to clone DVD to a blank disc, you need to put a blank DVD disc into your optical drive during the clone process. DVDFab also provides Blu-ray solutions, click Blu-ray Copy, Blu-ray Ripper to get more information.

Free Blu-ray Burner

Are you looking for a free Blu-ray burner? Use DVDFab Blu-ray Copy! DVDFab Blu-ray Copy is not a free burning tool, but you can try it freely for 30 days, during which period you can enjoy all the features of DVDFab Blu-ray Copy without spending a penny. It is a fast, full-featured and easy-to-use Blu-ray burner. Now let me show you how to use this powerful Blu-ray burner.

Step 1: Choose a copy mode
Run DVDFab 10, go to Copy module and click the “Copy Mode” tab on the top left corner of the main interface to choose a copy mode. You have 5 modes (see Note at the end) to choose. Here I take Main Movie mode as an example.


Step 2: Load the source
Insert the Blu-ray and DVDFab will load it automatically. If the source is ISO file/folder, you can load it by clicking the “Add” button or dragging and dropping it to the main interface directly.


Step 3: Customize your own Blu-ray
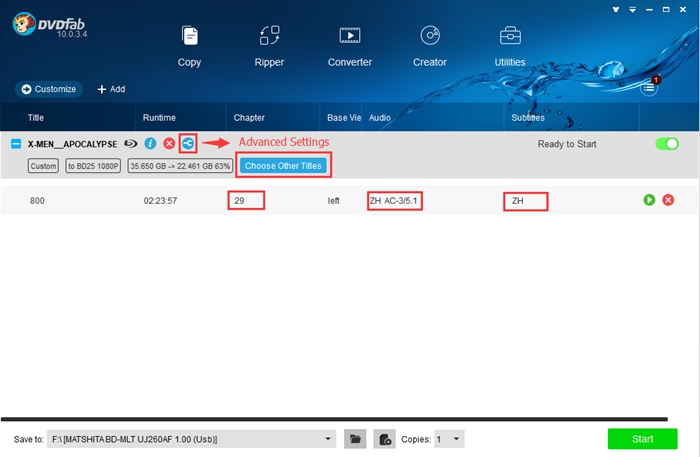
After the source is loaded in, the longest title, namely the main movie, will be selected by default. Then you can change the chapters, audio tracks, subtitles and customize your settings. On "Advanced Settings" panel, you can choose the output as BD 50/BD 25/BD 9/BD 5.


Step 4: Select an output directory
Navigate to the bottom of the main interface to select a directory to save the output Blu-ray: to select your optical drive as the directory from the drop-down list box is to burn the Blu-ray to a blank Blu-ray disc; to select a directory by clicking the "folder" icon is to save the output as a Blu-ray folder; to select a directory by clicking the "image" icon is to save the output as an ISO image file.


Step 5: Start the burning process
Click the “Start” button to start the burning process.

The burning process will be finished in a few minutes. If you choose to burn the Blu-ray to a blank disc, you need to insert a blank disc to your optical drive during the burning process. DVDFab also provides DVD solutions, and you can click DVD Copy, DVD Ripper to get more information.

Note:
5 modes:
Full Disc: copy all the content of the disc/ISO/folder source.
Main Movie: only copy the main movie title of the disc/ISO/folder source.
Customize: copy any content you want from the disc/ISO/folder source.
Merge: merge multiple DVDs into one DVD.
Clone/Burn: clone DVD in 1:1 ratio with nothing lost.

BD 9/BD 5 refers to DVD 9/DVD 5. But if you copy Blu-ray to DVD 9/DVD 5, you can only play the DVD 9/DVD 5 with Blu-ray player.

Blu-ray Burner

There are many Blu-ray burning software programs on the market, but which one is the best and the most full-featured? The best Blu-ray burner is easy-to-use, fast and powerful enough to allow you to burn Blu-ray as your own way and copy any Blu-ray disc/ISO file/folder to blank disc/ISO file/folder. DVDFab Blu-ray Copy is such a great Blu-ray Burner. Now let me show you how to use this Blu-ray burner to burn Blu-ray.

Step 1: Choose a copy mode
Run DVDFab 10, go to Copy module and click the “Copy Mode” tab on the top left corner of the main interface to choose a copy mode. You have 5 modes (see Note at the end) to choose. Here I take Customize mode as an example.


Step 2: Load the source
Insert the Blu-ray and DVDFab will load it automatically. If the source is ISO file/folder, you can load it by clicking the “Add” button or dragging and dropping it to the main interface directly.


Step 3: Customize your own Blu-ray
After the source is loaded in, the longest title, namely the main movie, will be selected by default. But here you can choose other titles. You also can choose the chapters, audio tracks, subtitles, and customize your settings. On "Advanced Settings" panel, you can customize your own menu and choose the output as BD 25 or BD 50.


Step 4: Select an output directory
Navigate to the bottom of the main interface to select a directory to save the output Blu-ray: to select your optical drive as the directory from the drop-down list box is to save the output to a blank Blu-ray disc; to select a directory by clicking the "folder" icon is to save the output as a Blu-ray folder; to select a directory by clicking the "image" icon is to save the output as an ISO image file.


Step 5: Start the burning process
Click the “Start” button to start the burning process.

If you choose to burn Blu-ray to a blank disc, you will be prompted to insert a blank Blu-ray disc to your optical drive. Insert a blank disc and after a while you can get your Blu-ray copy.

DVDFab also provides Blu-ray ripper solution, and if you want to learn how to rip Blu-ray, you can have a look at the tip Blu-ray Video Converter.

Note:
5 modes:
Full Disc: copy all the content of the disc/ISO/folder source.
Main Movie: only copy the main movie title of the disc/ISO/folder source.
Customize: copy any content you want from the disc/ISO/folder source.
Merge: merge multiple DVDs into one DVD.
Clone/Burn: clone DVD in 1:1 ratio with nothing lost.

2017年7月14日星期五

Free Blu-ray Backup – 30-Day Trial Blu-ray Copy

During its 30-day trial period, DVDFab Blu-ray Copy is a free Blu-ray backup tool which can help you copy and backup any Blu-rays freely. DVDFab Blu-ray Copy is easy-to-use, therefore novice users can learn its features in a short time. It also contains many advanced features, which can fulfill the needs of advanced users. This article is a step-by-step guide to show you how to back up Blu-ray with DVDFab Blu-ray Copy.

Step 1: Choose a copy mode
Run DVDFab 10, go to Copy module and click the “Copy Mode” tab on the top left corner of the main interface to choose a copy mode. You have 5 modes (see Note at the end) to choose. Here I take Full Disc mode as an example.


Step 2: Load the source
Insert the Blu-ray disc and DVDFab will load it automatically. Or you can click the “Add” button to load the source manually. If the source is an ISO file or folder, you can directly drag it to the main interface to load it.


Step 3: Customize your settings
After the source is loaded in, you can click the “Advanced Settings” icon to customize your settings. On this panel, you can decide the output as BD 50 or BD 25.


Step 4: Select an output directory
Navigate to the bottom of the main interface to select a directory to save the output Blu-ray: to select your optical drive as the directory from the drop-down list box is to burn the Blu-ray to a blank disc; to select a directory by clicking the "folder" icon is to save the output as a Blu-ray folder; to select a directory by clicking the "image" icon is to save the output as an ISO image file.


Step 5: Start the copy process
Click the "Start" button to start the copy process.

If you choose to copy the Blu-ray to a blank disc, you need to insert a blank Blu-ray disc to your optical drive during the burning process. Insert the blank disc and you can get your Blu-ray copy in a few minutes.

If you are also interested in ripping Blu-ray, you can go to Blu-ray Video Converter to have a look.


Note:
5 modes:
Full Disc: copy all the content of the disc/ISO/folder source.
Main Movie: only copy the main movie title of the disc/ISO/folder source.
Customize: copy any content you want from the disc/ISO/folder source.
Merge: merge multiple DVDs into one DVD.
Clone/Burn: clone DVD in 1:1 ratio with nothing lost.

2017年7月13日星期四

How to Get Rid of Cinavia on PS4


PS3 is not only a video game console but also a Blu-ray player, but there are times when the playback of a Blu-ray movie on your PS3 is stopped or the Blu-ray is muted, right? What’s the reason? It is because that the Cinavia detector has detected the Cinavia protection on the Blu-ray.

Same with PS3, PS4 cannot play back some Blu-ray movies protected by Cinavia. Blu-ray movie disc or copie contains Cinavia protection will be stopped or muted on PS4, and a Cinavia message will pop out to tell you it is protected by Cinavia. So how to get rid of Cinavia on PS4? Use DVDFab Blu-ray Cinavia Removal! This Cinavia Remover can help you bypass Cinavia on Blu-rays completely and permanently and let you enjoy Blu-ray movie freely on PS4. Now please have a look at how to remove Cinavia on Blu-ray with DVDFab Blu-ray Cinavia Removal.


Step 1: Choose the Main Movie mode

Run DVDFab 10, go to Copy module and choose the Main Movie mode.


Step 2: Load the source

Insert the disc and DVDFab will load it automatically. If the source is ISO file/folder, you can load it by clicking the “add” button or dragging and dropping it to the main interface directly.


Step 3:Select the Cinavia protected audio track

Click the drop-down list under “Audio” tab to make sure the Cinavia protected audio track is checked and there is a slash across the Cinavia logo.


Step 4: Choose the output size

Click the “Advanced Settings” icon to choose the output as BD 50 or BD 25 (The output LPCM audio is large, so you can only choose BD 50 or BD 25).

Step 5: Select an output directory

Navigate to the bottom of the main interface to select a directory: to select your optical drive as the directory from the drop-down list box is to copy the Blu-ray to a disc; to select a directory by clicking the “folder” icon is to save the output as a Blu-ray folder; to select a directory by clicking the “image” icon is to save the Cinavia-free Blu-ray as an ISO image file.


Step 6: Start the removal process

Click the “Start” button to start the process of removing Cinavia.

After only a few minutes, you can enjoy your Blu-ray movie on PS3 freely without any Cinavia message code popping out.

Note:

If you choose to copy the Blu-ray to a blank disc, you will be promoted to insert a blank Blu-ray disc to your drive during the copy process. Just do as the instruction says.

DVDFab Blu-ray Cinavia Removal has to work with the Main Movie mode of DVDFab Blu-ray Copy, Blu-ray Ripper or Blu-ray to DVD Converter.

Click here to find the list of Blu-rays supported now by DVDFab Blu-ray Cinavia Removal.


2017年7月12日星期三

How to Disable Cinavia on PS3


PS3 is not only a video game console but also a Blu-ray player, but there are times when the playback of a Blu-ray movie on your PS3 is stopped or the Blu-ray is muted, right? What’s the reason? It is because that the Cinavia detector has detected the Cinavia protection on the Blu-ray.

So how to disable Cinavia of Blu-ray on PS3? The best and easiest way is to remove the Cinavia on the Blu-ray. DVDFab Blu-ray Cinavia Removal is the top-ranked Cinavia remover which can remove Cinavia on Blu-ray easily and quickly. Now let me show you how to remove Cinavia from Blu-ray with DVDFab Blu-ray Cinavia Removal.

Step 1: Choose the Main Movie mode

Run DVDFab 10, go to Copy module and choose the main movie mode.


Step 2: Load the source

Insert the disc and DVDFab will load it automatically. If the source is ISO file/folder, you can load it by clicking the “add” button or dragging and dropping it to the main interface directly.


Step 3: Select the Cinavia protected audio track

Click the drop-down list under “Audio” tab to make sure the Cinavia protected audio track is checked and there is a slash across the Cinavia logo.


Step 4: Choose the output size

Click the “Advanced Settings” icon to choose the output as BD 50 or BD 25 (The output LPCM audio is large, so you can only choose BD 50 or BD 25).


Step 5:Select an output directory

Navigate to the bottom of the main interface to select a directory: to select your optical drive as the directory from the drop-down list box is to copy the Blu-ray to a disc; to select a directory by clicking the “folder” icon is to save the output as a Blu-ray folder; to select a directory by clicking the “image” icon is to save the Cinavia-free Blu-ray as an ISO image file.


Step 6: Start the removal process

Click the “Start” button to start the process of removing Cinavia.

After only a few minutes, you can enjoy your Blu-ray movie on PS3 freely without any Cinavia message code popping out.

Note:

If you choose to copy the Blu-ray to a blank disc, you will be promoted to insert a blank Blu-ray disc to your drive during the copy process. Just do as the instruction says.

DVDFab Blu-ray Cinavia Removal has to work with the main movie mode of DVDFab Blu-ray Copy, Blu-ray Ripper or Blu-ray to DVD Converter.


Click here to find the list of Blu-rays supported now by DVDFab Blu-ray Cinavia Removal.

2017年7月7日星期五

Free DVD Burning Software for Windows 8


Are you looking for a free DVD burning software for Windows 8? DVDFab DVD Copy would be your best choice. First, it is a professional and powerful DVD copy tool which can help you copy or burn your DVD effectively and efficiently. Second, it provides a 30-day free trial for you to experience all the features of the software. Third, it supports Windows 8. Therefore, if you are looking for a free DVD burning software program for Windows 8, you can try out DVDFab DVD Copy.

Please go to http://www.dvdfab.cn/download.htm to download DVDFab 10 and install it on your computer.

Step 1 :Run DVDFab 10, choose Copy module and click the "Copy Mode" tab on the top left corner of the main interface to choose a copy mode. You have 6 modes to choose. Here I take Full Disc mode as an example.


Step 2 : Load the source.


Step 3: After the source is loaded in, you can click the “Advanced Settings” icon to do advanced settings. On this panel, you can decide the output as DVD 5 or DVD 9.


Step 4 :Navigate to the bottom of the main interface to select a directory to save the output DVD: to select your optical drive as the directory from the drop-down list box is to save the output to a blank disc; to select a directory by clicking the "folder" icon is to save the output as a DVD folder; to select a directory by clicking the "image" icon is to save the output as an ISO image file.

Step 5:Click the "Start" button to start the copy process.

Note:

6 modes:

Full Disc: copy all the content of the disc/ISO/folder source.

Main Movie: only copy the main movie title of the disc/ISO/folder source.

Customize: copy any content you want from the disc/ISO/folder source.

Split:
split one DVD 9 into two DVD 5.

Merge:
merge multiple DVDs into one DVD.

Clone/Burn: clone DVD in 1:1 ratio with nothing lost.

If you choose to save the output to a blank disc, you will be promoted to insert a compatible media to your optical drive during the copy process. Just insert a blank disc to continue the copy process.


For more detailed information about DVDFab DVD Copy, please visit: http://www.dvdfab.cn/dvd-copy.htm.