2017年7月28日星期五

Review : DRM Removal Software from DVDFab

As much as the closed operating system, that is the Apple iOS, is good for protecting the integrity and security of applications installed within it’s tightly controlled ecosystem; such encapsulation also greatly limits the ability of Apple device owners to enjoy media that they acquired outside of the Apple “bubble”.

Apple’s DRM protection technology (i.e. Fairplay), specifically, is what prevents owners of Apple devices from playing back or converting movies, songs, games and other media that they acquired elsewhere.

Fortunately, it is possible to get around the overly-strict Fairplay technology. Doing so requires DRM removal software.

We recently tested one such product – the DRM Removal software for Apple.

One thing that we noticed immediately was how easy the product is to use. A lot of people who are not overly tech-savvy often give up on tasks such as DRM removal because they assume it to be an advanced technical task.

That is not the case with the DVDFab DRM removal software. The product interface is very intuitive so there is barely any learning curve, even for novice users.

Below are the few steps it takes to go DRM-free.


Download the DVDFab DRM removal software. The software is available for both PC and Mac, and comes with a 30-day free trial.


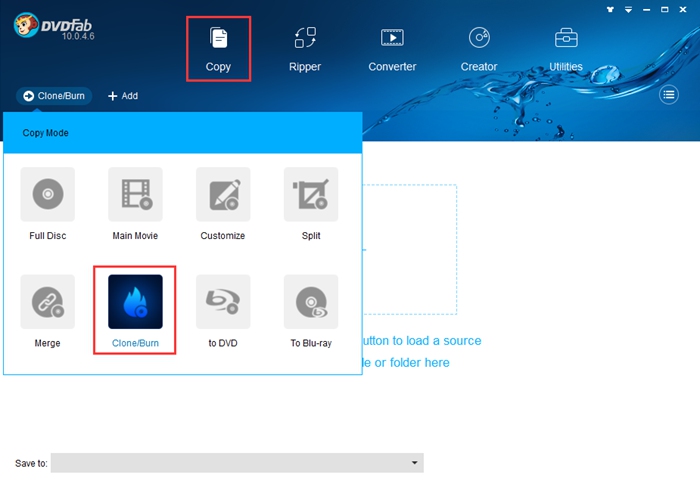
Once you’ve downloaded and launched the software, you will be brought to the DVDFab dashboard.


On the dashboard, select – Utilities —> DRM Removal

On the DRM Removal screen you will see two icons – one for video and one for music.


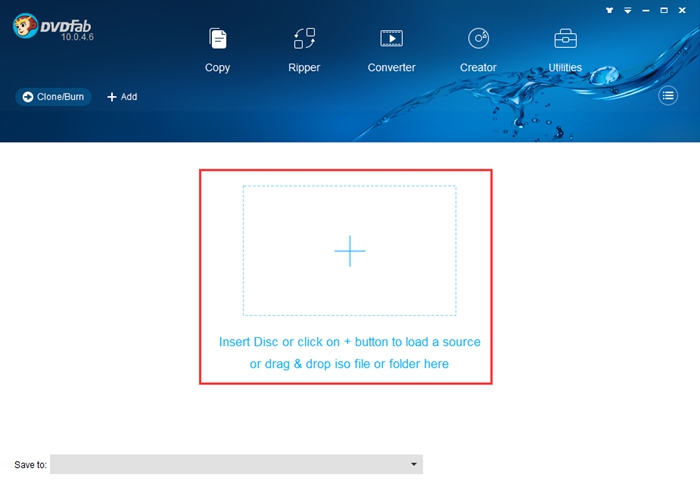
Once you’ve chosen the type of media that you wish to remove the DRM from, the next step is to load the file that you wish to work with.
You can load the file from your file system or directly from iTunes.


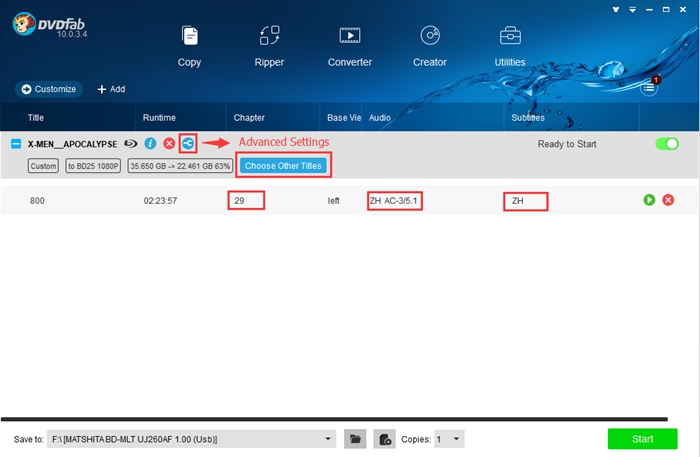
Once you’ve loaded the file, simply click the “Start” button at the bottom of the screen, and wait for your file to be released from the clutches of DRM


A few additional observations:

We found the conversion speed of DRM removal quite fast, especially taking into account that it is lossless

Batch Processing is another feature that we found quite useful when converting multiple files.

If you’ve been looking for a way to enjoy your non-Apple media on Apple devices, the DRM Removal for Apple software from DVDFab is a hassle-free way of doing it.

You can try it out yourself, using the 30-day free trial.

Here is the DRM Removal Software download link.

Enjoy your purchased songs of Apple seamlessly with DVDFab DRM Removal Software

Apple has its own DRM protection Technology called Apple Fairplay. On one hand Apple Fairplay helps in protecting your media files, on the other hand it defers users to enjoy their ‘Purchased’ songs videos, audio books on any unauthorized non-Apple devices. There are several methods by which users try to remove the DRM encryption from their devices. DVDFab DRM Removal for Apple is one such solution.
The software is available for Windows operating system and is compatible with Windows 7,8.1, Vista and Windows 10.
However, with DVDFab DRM Removal for Apple, is a potential DRM removal software available solution. Users can easily bypass Apple’s FairPlay and remove the DRM encryption from their legally purchased content in a flash. Remember, this process is nothing illegal and it only allows you to download your purchased songs. It removes the encryption from Apple music, videos, movies and audio books that play back flawlessly on popular music and video playback devices, such as portable music players, smart phones and tablets, etc.
You can try it for free. Only if you are convinced, you can purchase the app for $39. Here is a guideline on how to use the app.
1. First you have to download the DVDFab Removal software. Next, you have to install the application.
2. Next, click on Start DVDFab.
3. Now as the software opens, it will provide you with three options, Buy, Activate and Try. If you want to try the free version, click on Try. The software will open. Click on Utilities. As the dropdown menu opens, click on DRM Removal for Apple.
4. There are two options for DRM Removal of Apple media files, for Video and for Audio. If you want to remove DRM encryption from Videos, select “For Videos” else “For Audios”.

5. Now, click on “Add from iTunes”. You must have iTunes installed in the same machine in which you have installed DRM Removal for Apple. Here, you must remember on important point. To support seamless import of media files from iTunes, make sure the required setting is turned on. So, open iTunes, go to Edit, then go to Preferences. Now click on Advanced tab, and see if the option “Share iTunes Library XML with other applications” is checked.
6. As you import the files, click on Start located in the bottom of the app screen. In the bottom left corner of the app page, you will find the location where your audios and videos will be saved.
After the conversion is done, you will find the media files downloaded in the locations aforementioned.

The app is extremely easy to use with a very beautiful interface. The paid version is available for $39. If you are satisfied with the trial version, you may opt for the paid version which has more such options. Thee app is versatile and quick. Installation process and all other procedures are clear and self explanatory. We shall recommend our viewers to try the free version of DVDFab DRM Removal for Apple. you will be delighted to find how easily you can enjoy your purchased songs and videos of Apple to all your devices.

2017年7月27日星期四

DVDFab Review – DRM Removal For Apple


The DRM removal for Apple software from DVDFab is a tool that was designed to permanently remove the DRM protection that can be found embedded inside digital products that are offered by Apple from the Apple App Store.

Apple developed a proprietary technology for controlling the usage of digital products such as copyrighted music, movies and other software known as a DRM or Digital Rights Manager. Their technology was called Fairplay and it would only allow files that were encrypted with the FairPlay code to be used on devices that were Apple registered. This meant even if you bought the digital files legitimately you were limited on what devices you could play them on.

Key Features Of DVDFab‘s DRM Removal For Apple
Works on all versions of supported Windows OS; Vista/7/8/8.1 and 10 (both x32 and x64).
Supports file formats; M4V (video), M4P (Music) and M4B (audio books).
Requires an Internet connection to activate.
Capable of processing multiple files simultaneously.
Leaves digital content free of all embedded encryption.

Benefits Of Using DVDFab‘s DRM Removal For Apple
Allows you to transfer all of your downloaded files purchased through the Apple App Store on a non-Apple device.
Won’t affect the playback quality of any music or video files after it is run through it.

Speed through a large playlist or volumes of movies in one session.
It can be used in concert with other DVDFab programs like DVDFab Converter and DVDFab Creator.

Pricing
DVDFab is reasonably priced at just $39 per year. When getting started, you’ll receive a 30 day free trial period which is awesome. It’s important to point out that during the free trial period, you’ll only be able to convert 1 video and 5 songs.

My Final Thoughts
If you own a large amount of digital music, movies and audiobooks that you purchased over the years on a number of Apple mobile devices or iTunes enabled device and are wanting to move them to a non-Apple device you probably noticed that Apple has made this extremely difficult. This is because they have employed an embedded technology called a DRM or Digital Rights Manager.

Fortunately, there is a company called DVDFab and they have created a software tool that is designed to remove this embedded code that prevents any file that contains this DRM from being used on any device that has not been registered through Apple. The program is called DRM Removal for Apple and it is designed to be used on all Windows-based systems.

DRM Removal for Apple is a simple to use software that quickly and completely removes the FairPlay DRM that Apple embeds in all of the music, videos and audiobook files that are available in the Apple App Store. This DRM virtually locks up these files and keeps you from enjoying the things that you legitimately paid for and prevents you from playing on a non-Apple mobile device like your smartphone or tablet. DRM Removal for Apple is very easy to use and it can quickly clean the files of this limitation and it can do this for multiple files at the same time.

If you are interested in finding out more information about DRM Removal for Apple, just visit DVDFab website for more information.


2017年7月26日星期三

DVDFab Launches Holiday Special Offer: Save on All-In-One+ Movie Server

On July 21, Fengtao Software, the industry leader in the field of DVD, Blu-ray and video backup solutions, announces its Summer Holiday Special Offer. Offering a rarely seen chance for users to purchase its best-seller of all time — the lifetime version of DVDFab All-In-One package — and the stunning 4K UHD Blu-ray Player — DVDFab Movie Server — together at only $479, save more than  $747 than buying the two products separately, and another storewide 25 percent coupon applicable on all the shareware software products. Read on for the detailed information.

Save $747 to Buy DVDFab Movie Server + All-In-One Lifetime:

DVDFab All-In-One Lifetime is the No. 1 best-seller of Fengtao Software, because it packs 12 lifetime versions of its shareware products into one bundle. Namely, the DVD copy software, DVD ripper software, DVD creator software, DVD to Blu-ray converter software, Blu-ray copy software, 
Blu-ray ripper software, Blu-ray creator software, Blu-ray to DVD converter software, video converter software and three other products.

DVDFab Movie Server is the recent achievement of Fengtao Software in the field of home multimedia appliance. It is designed as a perfect life companion to the company’s multimedia software products DVDFab, as it allows its users to directly output the DVDFab 10 copied ISO files, including DVDs and Blu-rays, to a 3.5 inch SATA hard disk drive inside the Movie Server. With future versions of DVDFab 10 and the firmware upgrades of the Movie Server, more copy modes and modules are to be supported. By doing so, users can easily manage and organize their movie collections with the smart Poster Wall feature, and watch them with native menu support, all in one place.

During the Summer Holiday Special Offer time period, which runs until August 14, 2017, all customers can purchase the All-In-One Lifetime and the Movie Server together at only $479, saving $119 compared to purchasing those two products separately.

Storewide 25 percent off on All the Other Products:

In addition to the amazing offers mentioned above, users can also enjoy 25 percent discount buying any software product, single or bundles, including the media player software, 
Passkey software, PC backup software and the iOS data recovery software. The only one product which is excluded from the 25 percent discount is the Movie Server, which is specifically explained on its product page.

For the detailed terms and conditions of DVDFab Summer Holiday Special Offer 2017, please refer to: http://www.dvdfab.cn/promotion.htm .

About Fengtao Software:
Fengtao Software Inc., a professional multimedia software provider, has been dedicated to working on DVD cloner, DVD copy, Blu-ray copy, DVD ripper, DVD/Blu-ray conversion, video converter, DVD creator, Blu-ray creator, Blu-ray media player, etc. for more than 11 years with its well-known DVDFab software. It has more than 80 million global users.

More information at: http://www.dvdfab.cn.

News Source: Fengtao Software Inc

2017年7月21日星期五

Blu-ray to AVI Video Converter

To convert Blu-ray to AVI, you need to turn to a Blu-ray to AVI video converter. DVDFab Blu-ray Ripper is a professional Blu-ray to AVI video converter that can convert and rip any Blu-ray to AVI with minimal quality loss and at a super-fast speed. It is powerful, but it is pretty easy to use. The following is a step-by-step guide to show you how to convert Blu-ray to AVI with DVDFab Blu-ray Ripper.
Step 1: Load the source
Run DVDFab 10, go to Ripper module and load the source.
Step 2: Choose AVI profile
Navigate to the profile library on the top left corner of the main interface and choose Format > Video > AVI.


Step 3: Customize your video
After the source is loaded in, the longest title, namely the main movie, will be selected by default. But here you can choose other titles. You also can choose the chapters, audio tracks, subtitles, define the names of the chosen titles, and customize your settings. You are even able to edit the Blu-ray video with the built-in editor.


Step 4: Select an output directory
Navigate to the bottom of the main interface and click the "folder" button to select a directory to save the output video.


 Step 5: Start the ripping process
Click the “Start” button to start the process of ripping Blu-ray to AVI.
It is easy to rip Blu-ray to AVI, right? Just download DVDFab and try DVDFab Blu-ray Ripper freely!
This tip presents you how to convert Blu-ray to AVI video, but if you want to know how to convert video to Blu-ray, you can click how to make Blu-ray disc to have a look.

2017年7月20日星期四

Things You Need to Know to Clone a DVD

If you are a movie fan, you must have collected a stack of DVD movies. Do you want to clone these DVDs in case that they are lost or damaged? So how to clone a DVD? To clone a DVD, you need to prepare a DVD drive/burner, a blank DVD disc, and a software program that can clone DVD. As for the DVD clone software, I recommend you DVDFab DVD Copy. It is a professional DVD cloner that can help you clone DVD on Windows or Mac easily and quickly. Now let me show you how to clone a DVD with DVDFab DVD Copy.

Step 1: Choose Clone/Burn mode
Run DVDFab 10, go to Copy module and click the “Copy Mode” tab on the top left corner to choose Clone/Burn mode.


Step 2: Load the source
Insert the DVD disc to your optical drive and DVDFab will load it automatically.


Step 3: Select the output directory and start the clone process
Navigate to the bottom of the main interface and choose your optical drive as the directory from the dropdown list and then click the “Start” button.


Soon after, you can get a DVD copy which has the same content with the original disc. DVDFab can not only copy DVD but also rip DVD, and if you want to know how to rip and convert DVD, please go to Rip Any DVD with DVD Ripper to have a look.

Note:
During the process, the original disc will be ejected and DVDFab will prompt you to insert a blank DVD disc. Please just do as the instruction says.

2017年7月19日星期三

Three Steps to Clone a DVD

If you want to clone DVD easily and quickly, you can never miss DVDFab DVD Copy, for it can help you clone DVD with only three steps. In addition, if you do not have a blank disc at hand or want to save money, you can use DVDFab DVD Copy to clone the DVD to ISO file and save it on your hard drive. The following is a step-by-step tutorial to teach you how to clone a DVD with DVDFab DVD Copy.

Step 1: Choose the Clone/Burn mode
Run DVDFab 10, go to Copy module and choose Clone/Burn mode.

Step 2: Load the source
Insert your DVD into your optical drive and DVDFab will load it automatically.

Step 3: Select a directory and start the clone process
Navigate to the bottom of the main interface to select an output directory: to select your optical drive as the directory from the drop-down list is to clone DVD to a blank disc; to select a directory by clicking the “image” icon is to save the output as ISO image file. After the directory is selected, you can click the “Start” button to start clone process.


The whole process will be finished in a few minutes. If you choose to clone DVD to a blank disc, you need to put a blank DVD disc into your optical drive during the clone process. DVDFab also provides Blu-ray solutions, click Blu-ray Copy, Blu-ray Ripper to get more information.

Free Blu-ray Burner

Are you looking for a free Blu-ray burner? Use DVDFab Blu-ray Copy! DVDFab Blu-ray Copy is not a free burning tool, but you can try it freely for 30 days, during which period you can enjoy all the features of DVDFab Blu-ray Copy without spending a penny. It is a fast, full-featured and easy-to-use Blu-ray burner. Now let me show you how to use this powerful Blu-ray burner.

Step 1: Choose a copy mode
Run DVDFab 10, go to Copy module and click the “Copy Mode” tab on the top left corner of the main interface to choose a copy mode. You have 5 modes (see Note at the end) to choose. Here I take Main Movie mode as an example.


Step 2: Load the source
Insert the Blu-ray and DVDFab will load it automatically. If the source is ISO file/folder, you can load it by clicking the “Add” button or dragging and dropping it to the main interface directly.


Step 3: Customize your own Blu-ray
After the source is loaded in, the longest title, namely the main movie, will be selected by default. Then you can change the chapters, audio tracks, subtitles and customize your settings. On "Advanced Settings" panel, you can choose the output as BD 50/BD 25/BD 9/BD 5.


Step 4: Select an output directory
Navigate to the bottom of the main interface to select a directory to save the output Blu-ray: to select your optical drive as the directory from the drop-down list box is to burn the Blu-ray to a blank Blu-ray disc; to select a directory by clicking the "folder" icon is to save the output as a Blu-ray folder; to select a directory by clicking the "image" icon is to save the output as an ISO image file.


Step 5: Start the burning process
Click the “Start” button to start the burning process.

The burning process will be finished in a few minutes. If you choose to burn the Blu-ray to a blank disc, you need to insert a blank disc to your optical drive during the burning process. DVDFab also provides DVD solutions, and you can click DVD Copy, DVD Ripper to get more information.

Note:
5 modes:
Full Disc: copy all the content of the disc/ISO/folder source.
Main Movie: only copy the main movie title of the disc/ISO/folder source.
Customize: copy any content you want from the disc/ISO/folder source.
Merge: merge multiple DVDs into one DVD.
Clone/Burn: clone DVD in 1:1 ratio with nothing lost.

BD 9/BD 5 refers to DVD 9/DVD 5. But if you copy Blu-ray to DVD 9/DVD 5, you can only play the DVD 9/DVD 5 with Blu-ray player.

Blu-ray Burner

There are many Blu-ray burning software programs on the market, but which one is the best and the most full-featured? The best Blu-ray burner is easy-to-use, fast and powerful enough to allow you to burn Blu-ray as your own way and copy any Blu-ray disc/ISO file/folder to blank disc/ISO file/folder. DVDFab Blu-ray Copy is such a great Blu-ray Burner. Now let me show you how to use this Blu-ray burner to burn Blu-ray.

Step 1: Choose a copy mode
Run DVDFab 10, go to Copy module and click the “Copy Mode” tab on the top left corner of the main interface to choose a copy mode. You have 5 modes (see Note at the end) to choose. Here I take Customize mode as an example.


Step 2: Load the source
Insert the Blu-ray and DVDFab will load it automatically. If the source is ISO file/folder, you can load it by clicking the “Add” button or dragging and dropping it to the main interface directly.


Step 3: Customize your own Blu-ray
After the source is loaded in, the longest title, namely the main movie, will be selected by default. But here you can choose other titles. You also can choose the chapters, audio tracks, subtitles, and customize your settings. On "Advanced Settings" panel, you can customize your own menu and choose the output as BD 25 or BD 50.


Step 4: Select an output directory
Navigate to the bottom of the main interface to select a directory to save the output Blu-ray: to select your optical drive as the directory from the drop-down list box is to save the output to a blank Blu-ray disc; to select a directory by clicking the "folder" icon is to save the output as a Blu-ray folder; to select a directory by clicking the "image" icon is to save the output as an ISO image file.


Step 5: Start the burning process
Click the “Start” button to start the burning process.

If you choose to burn Blu-ray to a blank disc, you will be prompted to insert a blank Blu-ray disc to your optical drive. Insert a blank disc and after a while you can get your Blu-ray copy.

DVDFab also provides Blu-ray ripper solution, and if you want to learn how to rip Blu-ray, you can have a look at the tip Blu-ray Video Converter.

Note:
5 modes:
Full Disc: copy all the content of the disc/ISO/folder source.
Main Movie: only copy the main movie title of the disc/ISO/folder source.
Customize: copy any content you want from the disc/ISO/folder source.
Merge: merge multiple DVDs into one DVD.
Clone/Burn: clone DVD in 1:1 ratio with nothing lost.

2017年7月14日星期五

Free Blu-ray Backup – 30-Day Trial Blu-ray Copy

During its 30-day trial period, DVDFab Blu-ray Copy is a free Blu-ray backup tool which can help you copy and backup any Blu-rays freely. DVDFab Blu-ray Copy is easy-to-use, therefore novice users can learn its features in a short time. It also contains many advanced features, which can fulfill the needs of advanced users. This article is a step-by-step guide to show you how to back up Blu-ray with DVDFab Blu-ray Copy.

Step 1: Choose a copy mode
Run DVDFab 10, go to Copy module and click the “Copy Mode” tab on the top left corner of the main interface to choose a copy mode. You have 5 modes (see Note at the end) to choose. Here I take Full Disc mode as an example.


Step 2: Load the source
Insert the Blu-ray disc and DVDFab will load it automatically. Or you can click the “Add” button to load the source manually. If the source is an ISO file or folder, you can directly drag it to the main interface to load it.


Step 3: Customize your settings
After the source is loaded in, you can click the “Advanced Settings” icon to customize your settings. On this panel, you can decide the output as BD 50 or BD 25.


Step 4: Select an output directory
Navigate to the bottom of the main interface to select a directory to save the output Blu-ray: to select your optical drive as the directory from the drop-down list box is to burn the Blu-ray to a blank disc; to select a directory by clicking the "folder" icon is to save the output as a Blu-ray folder; to select a directory by clicking the "image" icon is to save the output as an ISO image file.


Step 5: Start the copy process
Click the "Start" button to start the copy process.

If you choose to copy the Blu-ray to a blank disc, you need to insert a blank Blu-ray disc to your optical drive during the burning process. Insert the blank disc and you can get your Blu-ray copy in a few minutes.

If you are also interested in ripping Blu-ray, you can go to Blu-ray Video Converter to have a look.


Note:
5 modes:
Full Disc: copy all the content of the disc/ISO/folder source.
Main Movie: only copy the main movie title of the disc/ISO/folder source.
Customize: copy any content you want from the disc/ISO/folder source.
Merge: merge multiple DVDs into one DVD.
Clone/Burn: clone DVD in 1:1 ratio with nothing lost.

2017年7月13日星期四

How to Get Rid of Cinavia on PS4


PS3 is not only a video game console but also a Blu-ray player, but there are times when the playback of a Blu-ray movie on your PS3 is stopped or the Blu-ray is muted, right? What’s the reason? It is because that the Cinavia detector has detected the Cinavia protection on the Blu-ray.

Same with PS3, PS4 cannot play back some Blu-ray movies protected by Cinavia. Blu-ray movie disc or copie contains Cinavia protection will be stopped or muted on PS4, and a Cinavia message will pop out to tell you it is protected by Cinavia. So how to get rid of Cinavia on PS4? Use DVDFab Blu-ray Cinavia Removal! This Cinavia Remover can help you bypass Cinavia on Blu-rays completely and permanently and let you enjoy Blu-ray movie freely on PS4. Now please have a look at how to remove Cinavia on Blu-ray with DVDFab Blu-ray Cinavia Removal.


Step 1: Choose the Main Movie mode

Run DVDFab 10, go to Copy module and choose the Main Movie mode.


Step 2: Load the source

Insert the disc and DVDFab will load it automatically. If the source is ISO file/folder, you can load it by clicking the “add” button or dragging and dropping it to the main interface directly.


Step 3:Select the Cinavia protected audio track

Click the drop-down list under “Audio” tab to make sure the Cinavia protected audio track is checked and there is a slash across the Cinavia logo.


Step 4: Choose the output size

Click the “Advanced Settings” icon to choose the output as BD 50 or BD 25 (The output LPCM audio is large, so you can only choose BD 50 or BD 25).

Step 5: Select an output directory

Navigate to the bottom of the main interface to select a directory: to select your optical drive as the directory from the drop-down list box is to copy the Blu-ray to a disc; to select a directory by clicking the “folder” icon is to save the output as a Blu-ray folder; to select a directory by clicking the “image” icon is to save the Cinavia-free Blu-ray as an ISO image file.


Step 6: Start the removal process

Click the “Start” button to start the process of removing Cinavia.

After only a few minutes, you can enjoy your Blu-ray movie on PS3 freely without any Cinavia message code popping out.

Note:

If you choose to copy the Blu-ray to a blank disc, you will be promoted to insert a blank Blu-ray disc to your drive during the copy process. Just do as the instruction says.

DVDFab Blu-ray Cinavia Removal has to work with the Main Movie mode of DVDFab Blu-ray Copy, Blu-ray Ripper or Blu-ray to DVD Converter.

Click here to find the list of Blu-rays supported now by DVDFab Blu-ray Cinavia Removal.


2017年7月12日星期三

How to Disable Cinavia on PS3


PS3 is not only a video game console but also a Blu-ray player, but there are times when the playback of a Blu-ray movie on your PS3 is stopped or the Blu-ray is muted, right? What’s the reason? It is because that the Cinavia detector has detected the Cinavia protection on the Blu-ray.

So how to disable Cinavia of Blu-ray on PS3? The best and easiest way is to remove the Cinavia on the Blu-ray. DVDFab Blu-ray Cinavia Removal is the top-ranked Cinavia remover which can remove Cinavia on Blu-ray easily and quickly. Now let me show you how to remove Cinavia from Blu-ray with DVDFab Blu-ray Cinavia Removal.

Step 1: Choose the Main Movie mode

Run DVDFab 10, go to Copy module and choose the main movie mode.


Step 2: Load the source

Insert the disc and DVDFab will load it automatically. If the source is ISO file/folder, you can load it by clicking the “add” button or dragging and dropping it to the main interface directly.


Step 3: Select the Cinavia protected audio track

Click the drop-down list under “Audio” tab to make sure the Cinavia protected audio track is checked and there is a slash across the Cinavia logo.


Step 4: Choose the output size

Click the “Advanced Settings” icon to choose the output as BD 50 or BD 25 (The output LPCM audio is large, so you can only choose BD 50 or BD 25).


Step 5:Select an output directory

Navigate to the bottom of the main interface to select a directory: to select your optical drive as the directory from the drop-down list box is to copy the Blu-ray to a disc; to select a directory by clicking the “folder” icon is to save the output as a Blu-ray folder; to select a directory by clicking the “image” icon is to save the Cinavia-free Blu-ray as an ISO image file.


Step 6: Start the removal process

Click the “Start” button to start the process of removing Cinavia.

After only a few minutes, you can enjoy your Blu-ray movie on PS3 freely without any Cinavia message code popping out.

Note:

If you choose to copy the Blu-ray to a blank disc, you will be promoted to insert a blank Blu-ray disc to your drive during the copy process. Just do as the instruction says.

DVDFab Blu-ray Cinavia Removal has to work with the main movie mode of DVDFab Blu-ray Copy, Blu-ray Ripper or Blu-ray to DVD Converter.


Click here to find the list of Blu-rays supported now by DVDFab Blu-ray Cinavia Removal.

2017年7月7日星期五

Free DVD Burning Software for Windows 8


Are you looking for a free DVD burning software for Windows 8? DVDFab DVD Copy would be your best choice. First, it is a professional and powerful DVD copy tool which can help you copy or burn your DVD effectively and efficiently. Second, it provides a 30-day free trial for you to experience all the features of the software. Third, it supports Windows 8. Therefore, if you are looking for a free DVD burning software program for Windows 8, you can try out DVDFab DVD Copy.

Please go to http://www.dvdfab.cn/download.htm to download DVDFab 10 and install it on your computer.

Step 1 :Run DVDFab 10, choose Copy module and click the "Copy Mode" tab on the top left corner of the main interface to choose a copy mode. You have 6 modes to choose. Here I take Full Disc mode as an example.


Step 2 : Load the source.


Step 3: After the source is loaded in, you can click the “Advanced Settings” icon to do advanced settings. On this panel, you can decide the output as DVD 5 or DVD 9.


Step 4 :Navigate to the bottom of the main interface to select a directory to save the output DVD: to select your optical drive as the directory from the drop-down list box is to save the output to a blank disc; to select a directory by clicking the "folder" icon is to save the output as a DVD folder; to select a directory by clicking the "image" icon is to save the output as an ISO image file.

Step 5:Click the "Start" button to start the copy process.

Note:

6 modes:

Full Disc: copy all the content of the disc/ISO/folder source.

Main Movie: only copy the main movie title of the disc/ISO/folder source.

Customize: copy any content you want from the disc/ISO/folder source.

Split:
split one DVD 9 into two DVD 5.

Merge:
merge multiple DVDs into one DVD.

Clone/Burn: clone DVD in 1:1 ratio with nothing lost.

If you choose to save the output to a blank disc, you will be promoted to insert a compatible media to your optical drive during the copy process. Just insert a blank disc to continue the copy process.


For more detailed information about DVDFab DVD Copy, please visit: http://www.dvdfab.cn/dvd-copy.htm.